
In early 2015, after years of running deployments on Amazon EC2, my team at Luminis Technologies was tasked with building a new deployment platform for all our development teams. The AWS-based setup had worked very well for deploying new releases over the years, but the deployment setup, with custom scripts and tooling to automate deployments, wasn’t very easy for teams outside of operations to use—especially small teams that didn’t have the resources to learn all of the details about these scripts and tools. The main issue was that there was no “unit-of-deployment,” and without one, there was a gap between development and operations. The containerization trend was clearly going to change that.
If you haven't bought in to the production readiness of Docker and Kubernetes yet, read about how my team became early adopters. We have now been running Kubernetes in production for over a year.
Starting out with containers and container orchestration tools
I now believe containers are the deployment format of the future. They make it much easier to package an application with its required infrastructure. While tools such as Docker provide the actual containers, we also need tools to take care of things such as replication and failovers, as well as APIs to automate deployments to multiple machines.
The state of clustering tools such as Kubernetes and Docker Swarm was very immature in early 2015, with only early alpha versions available. We still tried using them and started with Docker Swarm.
At first we used it to handle networking on our own with the ambassador pattern and a bunch of scripts to automate the deployments. How hard could it possibly be? That was our first hard lesson: Container clustering, networking, and deployment automation are actually very hard problems to solve.
We realized this quickly enough and decided to bet on another one of the available tools. Kubernetes seemed to be the best choice, since it was being backed by Google, Red Hat, Core OS, and other groups that clearly know about running large-scale deployments.
Load balancing with Kubernetes
When working with Kubernetes, you have to become familiar with concepts such as pods, services, and replication controllers. If you're not already familiar with these concepts, there are some excellent resources available to get up to speed. The Kubernetes documentation is a great place to start, since it has several guides for beginners.
Once we had a Kubernetes cluster up and running, we could deploy an application using kubectl, the Kubernetes CLI, but we quickly found that kubectl wasn't sufficient when we wanted to automate deployments. But first, we had another problem to solve: How to access the deployed application from the Internet?
The service in front of the deployment has an IP address, but this address only exists within the Kubernetes cluster. This means the service isn’t available to the Internet at all! When running on Google Cloud Engine, Kubernetes can automatically configure a load balancer to access the application. If you’re not on GCE (like us), you need to do a little extra legwork to get load balancing working.
It’s possible to expose a service directly on a host machine port—and this is how a lot of people get started—but we found that it voids a lot of Kubernetes' benefits. If we rely on ports in our host machines, we will get into port conflicts when deploying multiple applications. It also makes it much harder to scale the cluster or replace host machines.
A two-step load-balancer setup
We found that a much better approach is to configure a load balancer such as HAProxy or NGINX in front of the Kubernetes cluster. We started running our Kubernetes clusters inside a VPN on AWS and using an AWS Elastic Load Balancer to route external web traffic to an internal HAProxy cluster. HAProxy is configured with a “back end” for each Kubernetes service, which proxies traffic to individual pods.
This two-step load-balancer setup is mostly in response AWS ELB's fairly limited configuration options. One of the limitations is that it can’t handle multiple vhosts. This is the reason we’re using HAProxy as well. Just using HAProxy (without an ELB) could also work, but you would have to work around dynamic AWS IP addresses on the DNS level.

Figure 1: Diagram of our two-step process for load balancing
In any case, we needed a mechanism to dynamically reconfigure the load balancer (HAProxy, in our case) when new Kubernetes services are created.
The Kubernetes community is currently working on a feature called ingress. It will make it possible to configure an external load balancer directly from Kubernetes. Currently, this feature isn’t really usable yet because it’s simply not finished. Last year, we used the API and a small open-source tool to configure load balancing instead.
Configuring load balancing
First, we needed a place to store load-balancer configurations. They could be stored anywhere, but because we already had etcd available, we decided to store the load-balancer configurations there. We use a tool called confd to watch configuration changes in etcd and generate a new HAProxy configuration file based on a template. When a new service is added to Kubernetes, we add a new configuration to etcd, which results in a new configuration file for HAProxy.
Kubernetes: Maturing the right way
There are still plenty of unsolved problems in Kubernetes, just as there are in load balancing generally. Many of these issues are recognized by the community, and there are design documents that discuss new features that can solve some of them. But coming up with solutions that work for everyone requires time, which means some of these features can take quite a while before they land in a release. This is a good thing, because it would be harmful in the long term to take shortcuts when designing new functionality.
This doesn’t mean Kubernetes is limited today. Using the API, it’s possible to make Kubernetes do pretty much everything you need it to if you want to start using it today. Once more features land in Kubernetes itself, we can replace custom solutions with standard ones.
After we developed our custom solution for load balancing, our next challenge was implementing an essential deployment technique for us: Blue-green deployments.
Blue-green deployments in Kubernetes
A blue-green deployment is one without any downtime. In contrast to rolling updates, a blue-green deployment works by starting a cluster of replicas running the new version while all the old replicas are still serving all the live requests. Only when the new set of replicas is completely up and running is the load-balancer configuration changed to switch the load to the new version. A benefit of this approach is that there’s always only one version of the application running, reducing the complexity of handling multiple concurrent versions. Blue-green deployments also work better when the number of replicas is fairly small.
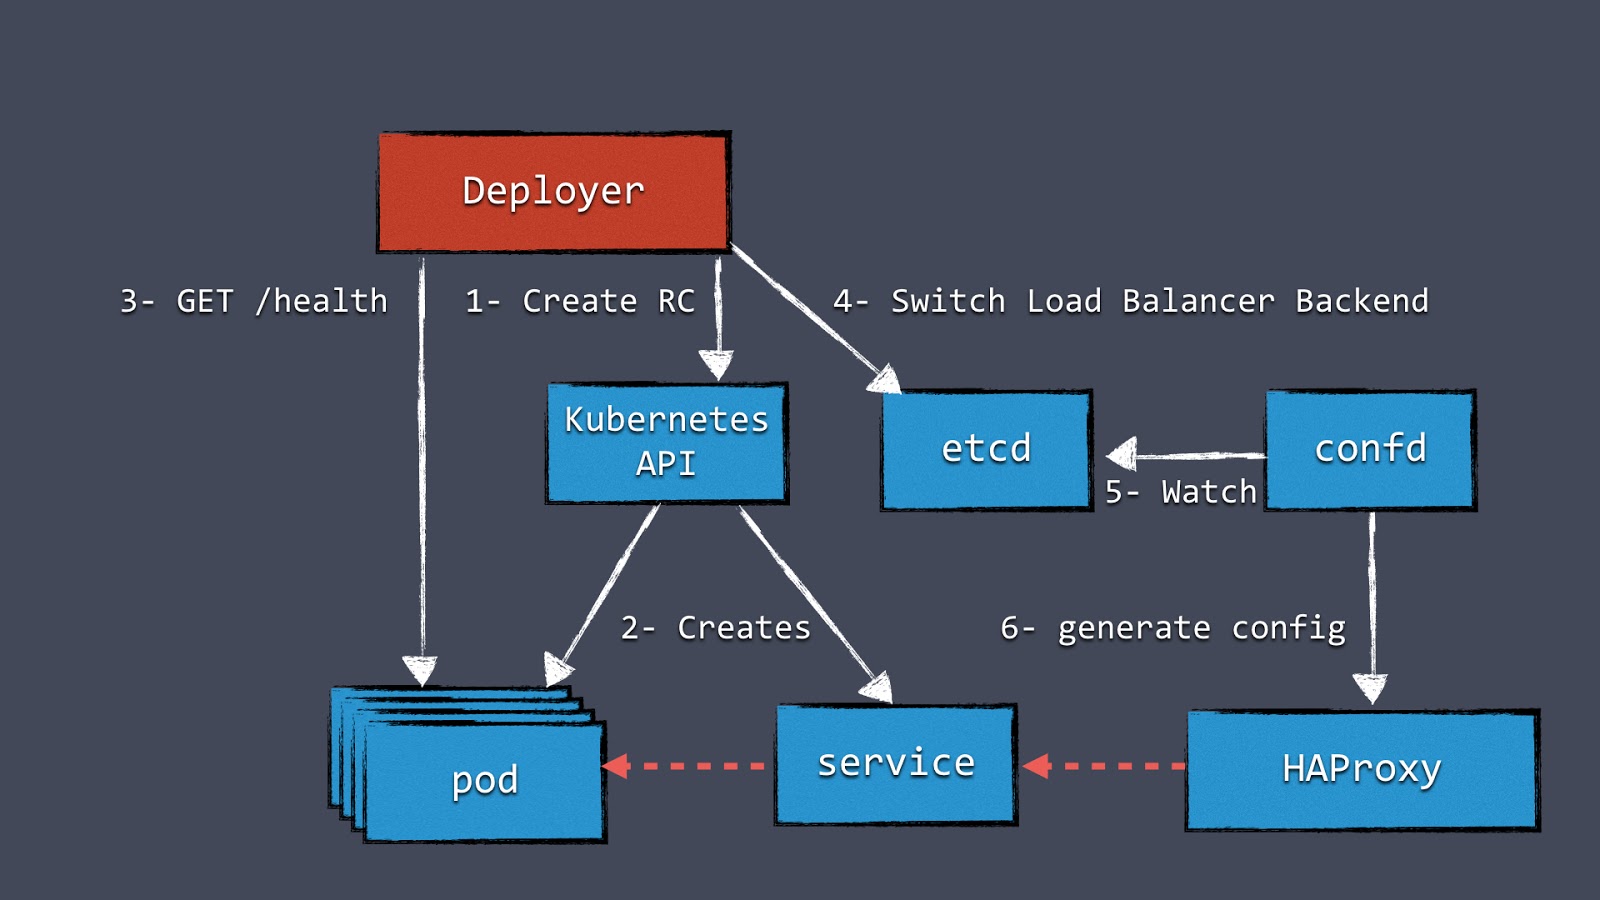
Figure 2: Our blue-green deployments with Kubernetes
Figure 2 shows a component “Deployer” that orchestrates the deployment. This component can easily be created by your own team because we open-sourced our implementation under the Apache License as part of the Amdatu umbrella project. It also comes with a web UI to configure deployments.
An important aspect of this mechanism is the health checking it performs on the pods before reconfiguring the load balancer. We wanted each component that was deployed to provide a health check. Now we typically add a health check that's available on HTTP to each application component.
Making the deployments automatic
With the Deployer in place, we were able to hook up deployments to a build pipeline. Our build server can, after a successful build, push a new Docker image to a registry such as Docker Hub. Then the build server can invoke the Deployer to automatically deploy the new version to a test environment. The same image can be promoted to production by triggering the Deployer on the production environment.

Figure 3: Our automated container deployment pipeline
Know your resource constraints
Knowing our resource constraints was critical when we started using Kubernetes. You can configure resource requests and CPU/memory limits on each pod. You can also control resource guarantees and bursting limits.
These settings are extremely important for running multiple containers together efficiently. If we didn't set these settings correctly, containers would often crash because they couldn't allocate enough memory.
Start early with setting and testing constraints. Without constraints, everything will still run fine, but you'll get a big, unpleasant surprise when you put any serious load on one of the containers.
How we monitored Kubernetes
When we had Kubernetes mostly set up, we quickly realized that monitoring and logging would be crucial in this new dynamic environment. Logging into a server to look a log files just doesn’t work anymore when you're dealing with a large number of replicas and nodes. As soon as you start using Kubernetes, you should also have a plan to build centralized logging and monitoring.
Logging
There are plenty of open-source tools available for logging. We decided to use Graylog—an excellent tool for logging—and Apache Kafka, a messaging system to collect and digest logs from our containers. The containers send logs to Kafka, and Kafka hands them off to Graylog for indexing. We chose to make the application components send logs to Kafka themselves so that we could stream logs in an easy-to-index format. Alternatively, there are tools that retrieve logs from outside the container and forward them to a logging solution.
Monitoring
Kubernetes does an excellent job of recovering when there's an error. When pods crash for any reason, Kubernetes will restart them. When Kubernetes is running replicated, end users probably won't even notice a problem. Kubernetes recovery works so well that we have had situations where our containers would crash multiple times a day because of a memory leak, without anyone (including ourselves) noticing it.
Although this is great from the perspective of Kubernetes, you probably still want to know whenever there’s a problem. We use a custom health-check dashboard that monitors the Kubernetes nodes, individual pods—using application-specific health checks—and other services such as data stores. To implement a dashboard such as this, the Kubernetes API proves to be extremely valuable again.
We also thought it was important to measure load, throughput, application errors, and other stats. Again, the open-source space has a lot to offer. Our application components post metrics to an InfluxDB time-series store. We also use Heapster to gather Kubernetes metrics. The metrics stored in InfluxDB are visualized in Grafana, an open-source dashboard tool. There are a lot of alternatives to the InfluxDB/Grafana stack, and any one of them will provide a lot of value toward keeping track of how things are running.
Data stores and Kubernetes
A question that many new Kubernetes users ask is “How should I handle my data stores with Kubernetes?”
When running a data store such as MongoDB or MySQL, you most likely want the data to be persistent. Out of the box, containers lose their data when they restart. This is fine for stateless components, but not for a persistent data store. Kubernetes has the concept of volumes to work with persistent data.
A volume can be backed by a variety of implementations, including files on the host machines, AWS Elastic Block Store (EBS), and nfs. When we were researching the question of persistent data, this provided a good answer, but it wasn't an answer for our running data stores yet.
Replication issues
In most deployments, the data stores also run replicated. Mongo typically runs in a Replica Set, and MySQL could be running in primary/replica mode. This introduces a few problems. First of all, it’s important that each node in the data store’s cluster is backed by a different volume. Writing to the same volume will lead to data corruption. Another issue is that most data stores require precise configuration to get the clustering up and running; auto discovery and configuration of nodes is not common.
At the same time, a machine that runs a data store is often specifically tuned for that type of workload. Higher IOPS could be one example. Scaling (adding/removing nodes) is an expensive operation for most data stores as well. All these things don’t match very well with the dynamic nature of Kubernetes deployments.
The decision not to use Kubernetes for running data stores in production
This brings us to a situation where we found that the benefits of running a data store inside Kubernetes are limited. The dynamics that Kubernetes give us can’t really be used. The setup is also much more complex than most Kubernetes deployments.
Because of this, we are not running our production data stores inside Kubernetes. Instead, we set up these clusters manually on different hosts, with all the tuning necessary to optimize the data store in question. Our applications running inside Kubernetes just connect to the data store cluster like normal. The important lesson is that you don’t have to run everything in Kubernetes once you have Kubernetes. Besides data stores and our HAProxy servers, everything else does run in Kubernetes, though, including our monitoring and logging solutions.
Why we're excited about our next year with Kubernetes
Looking at our deployments today, Kubernetes is absolutely fantastic. The Kubernetes API is a great tool when it comes to automating a deployment pipeline. Deployments are not only more reliable, but also much faster, because we’re no longer dealing with VMs. Our builds and deployments have become more reliable because it’s easier to test and ship containers.
We see now that this new way of deployment was necessary to keep up with other development teams around the industry that are pushing out deployments much more often and lowering their overhead for doing so.
Cost calculation
Looking at costs, there are two sides to the story. To run Kubernetes, an etcd cluster is required, as well as a master node. While these are not necessarily expensive components to run, this overhead can be relatively expensive when it comes to very small deployments. For these types of deployments, it’s probably best to use a hosted solution such as Google's Container Service.
For larger deployments, it’s easy to save a lot on server costs. The overhead of running etcd and a master node aren’t significant in these deployments. Kubernetes makes it very easy to run many containers on the same hosts, making maximum use of the available resources. This reduces the number of required servers, which directly saves you money. When running Kubernetes sounds great, but the ops side of running such a cluster seems less attractive, there are a number of hosted services to look at, including Cloud RTI, which is what my team is working on.
A bright future for Kubernetes
Running Kubernetes in a pre-released version was challenging, and keeping up with (breaking) new releases was almost impossible at times. Development of Kubernetes has been happening at light-speed in the past year, and the community has grown into a legitimate powerhouse of dev talent. It’s hard to believe how much progress has been made in just over a year.
Keep learning
Choose the right ESM tool for your needs. Get up to speed with the our Buyer's Guide to Enterprise Service Management Tools
What will the next generation of enterprise service management tools look like? TechBeacon's Guide to Optimizing Enterprise Service Management offers the insights.
Discover more about IT Operations Monitoring with TechBeacon's Guide.
What's the best way to get your robotic process automation project off the ground? Find out how to choose the right tools—and the right project.
Ready to advance up the IT career ladder? TechBeacon's Careers Topic Center provides expert advice you need to prepare for your next move.
