
There’s more to being a successful professional Android developer than just knowing the ins and outs of the Android SDK. From productivity tips to making sure that you give your users the best experience possible, here are my tools of choice and words of advice to help you become a successful Android developer.
Setting up productivity tooling
To maximize productivity using your computer, it helps to optimize the so-called "hot path," or the actions you perform most frequently. One tool that pretty much every person who writes software will have to use is a terminal, so we’ll start there.
Caveat: I personally use a Mac for development, which has a Unix-based operating system. This means that most of the terminal tips I mention will be applicable to Linux users as well. These tips have not been tested on Windows.
Terminal
The first of several tools I would recommend using is Oh My Zsh, “an open source, community-driven framework for managing your ZSH configuration. It comes bundled with a ton of helpful functions, helpers, plugins, [and] themes”. In simpler terms, it makes your terminal design look better, which makes it easier to work with.
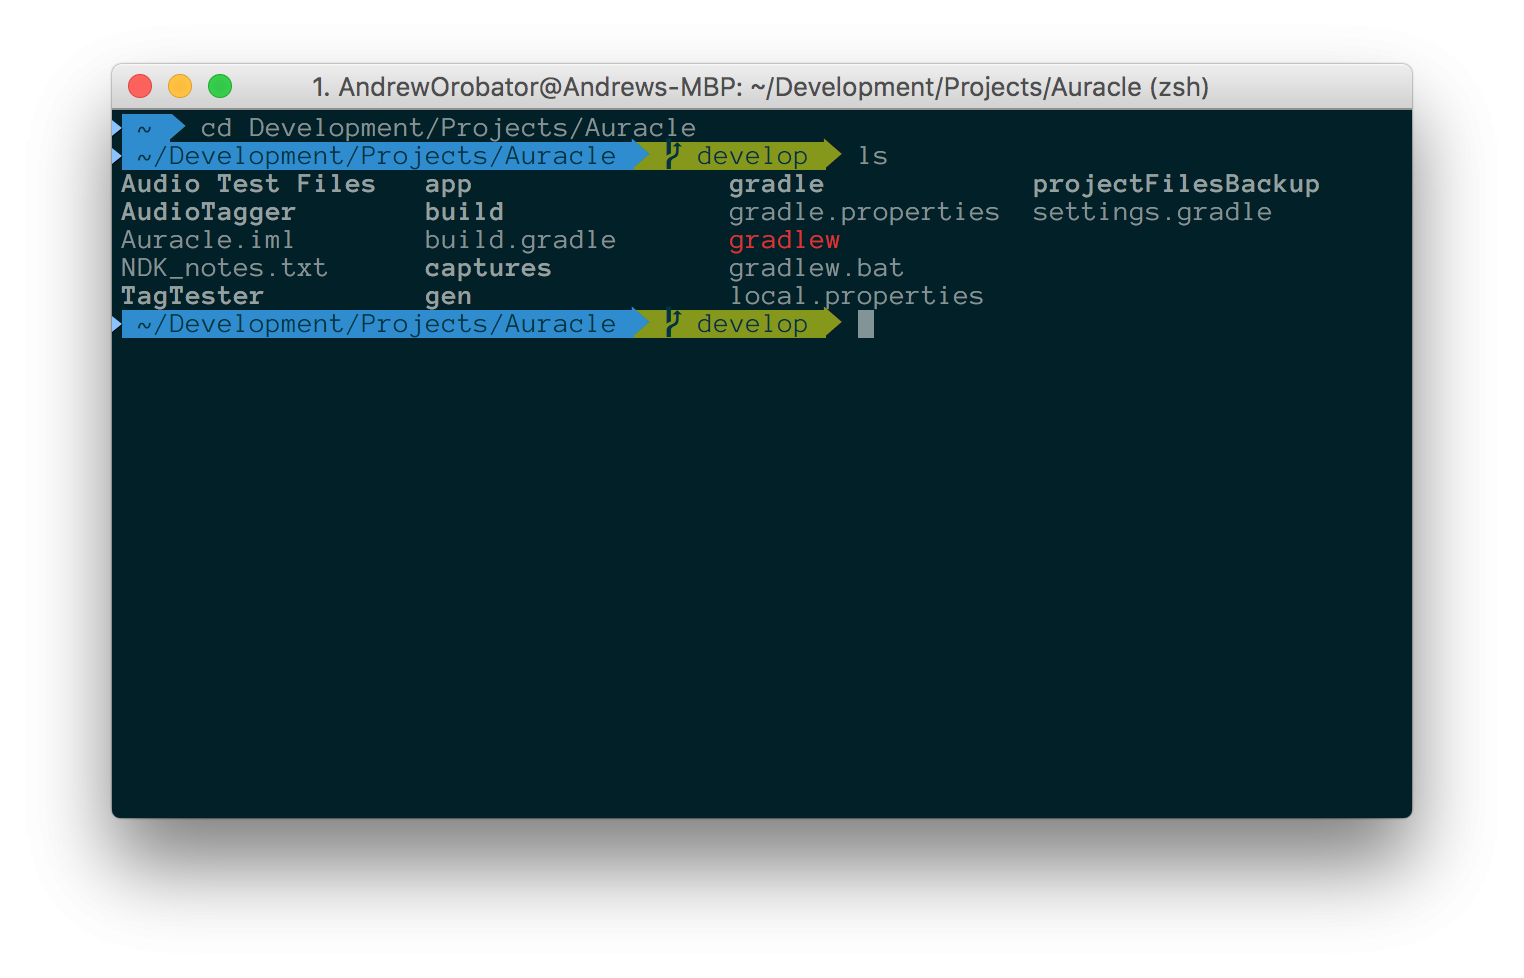 My terminal with the Agnoster theme and a dark solarized color scheme. I’m in a Git repo so it recognizes this and puts the name of the branch (develop) in the terminal prompt. It also has built-in status indicators such as whether or not you have a dirty or clean working directory, and if you’re currently in the process of merging.
The biggest feature is its auto-completion, particularly with Git. With the regular bash shell, you can auto-complete directory names by pressing tab. If there’s more than one match, options come up that you can cycle through by pressing tab again. Oh My Zsh takes this idea and runs with it, by letting you auto-complete not only directories but aliases and terminal programs as well.
With Git, for example, typing “git pu” then hitting tab would bring up options to pull or push, with details on what each command does. Hitting tab again would select “git push” and hitting enter would execute auto-completion.

In addition to auto-completing Git commands, it can also auto-complete branch names. And if you happen to be inside of a Git repository, it will tell you the name of the branch you’re currently on. In addition to having too many plugins to list (I’ll list one more for you: auto-suggestion, check it out, it’s cool), Oh My Zsh also has many themes. You can try Oh My Zsh for free here.
Even without using Oh My Zsh, the terminal has some built-in tools to allow you to type less code by putting you in control of your command history. By pressing up, you can see the previous command entered. ⌃+R allows you to search your command history and pressing it a second time cycles through search results. Hitting enter selects the command to be run.
 in action")
Most shells also allow you to create shortcuts of your own called aliases. Aliases are pieces of text that are interpreted by the shell as the text the alias points to. Aliases can be created by editing ~/.zshrc if you have zsh for a shell, or ~/.bashrc if you have a bash shell. If you’re not sure what shell you have, running “echo $SHELL” should help you out. Once you’re in the correct file, add the line:
alias NAME_OF_YOUR_ALIAS = “FULL_COMMAND_FOR_ALIAS”
After editing the file, you can either restart your terminal application for the changes to take effect, or you can enter “source ~/.zshrc” for the changes to take effect immediately. It’s important to note that everyone will probably have different aliases, but what matters is making aliases for the things you use most often, or optimizing the hot path. Here are a few of the aliases that I use.
alias c=”clear” # Clears your terminal window of all output
alias d=”adb devices” # Lists all connected Android devices and emulators
alias gs=”git status” # Displays status of your working tree in a repository
alias gas=”git add *” # Adds all files to the git staging area
alias log=”adb logcat” # Displays the android logcat
alias adbr=”adb kill-server; adb start-server; d” # Restarts the adb server, adb can be quite finnicky and restarting helps to alleviate those problems. That last d character is a reference to the alias defined above, which points to “adb devices"
Window management and emulators
BetterSnapTool ($2.99) and Moom ($9.99) are both paid products. Both BetterSnapTool and Moom allow you to automatically resize windows to be maximized, take up a half of the screen (vertical or horizontal) or even take up a quarter of the screen. These actions can either be activated by dragging the window to a specific place on your screen, or with keyboard shortcuts you specify.

In addition to moving windows around, Moom can also save window layouts so you can return to a previous layout after changing windows around. I personally use BetterSnapTool and these are the keyboard shortcuts I’ve configured for it:
- ⌃ + ⌘ + M — Maximize current window.
- ⌃ + ⌘ + ⇧ + M — Maximize current window and move it to the next display.
- ⌃ + ⌘ + ← — Make window fill left half of screen.
- ⌃ + ⌘ + → — Make window fill right half of screen.
- ⌃ + ⌘ + ↑ — Make window fill top half of screen.
- ⌃ + ⌘ + ↓ — Make window fill bottom half of screen.
- ⌃ + ⌘ + [ — Make window fill top left quarter of screen.
- ⌃ + ⌘ + ] — Make window fill top right quarter of screen.
- ⌃ + ⌘ + ; — Make window fill bottom left quarter of screen.
- ⌃ + ⌘ + ’ — Make window fill bottom right quarter of screen.
When running my code, I’ll either deploy using an emulator or a real device. Either way, I like having everything on my computer screen so if I’m using a real device to test, I’ll almost certainly be using Vysor to mirror my device’s screen on my computer. In addition to mirroring, Vysor also lets you interact with your device on your desktop using click and drag mouse events. Vysor is available for free as a Chrome extension here and has a couple of paid features including dragging and dropping files. If I’m using an emulator, the regular emulator bundled with the Android SDK is alright, but I prefer Genymotion due to its speed, as well as integration with Alfred.
Spotlight replacement
Alfred is probably my favorite piece of software. I use it several times a day and have done so for several years. In essence, Alfred is a program used to replace Apple’s Spotlight. It is invoked using the default shortcut of ⌘+Space.
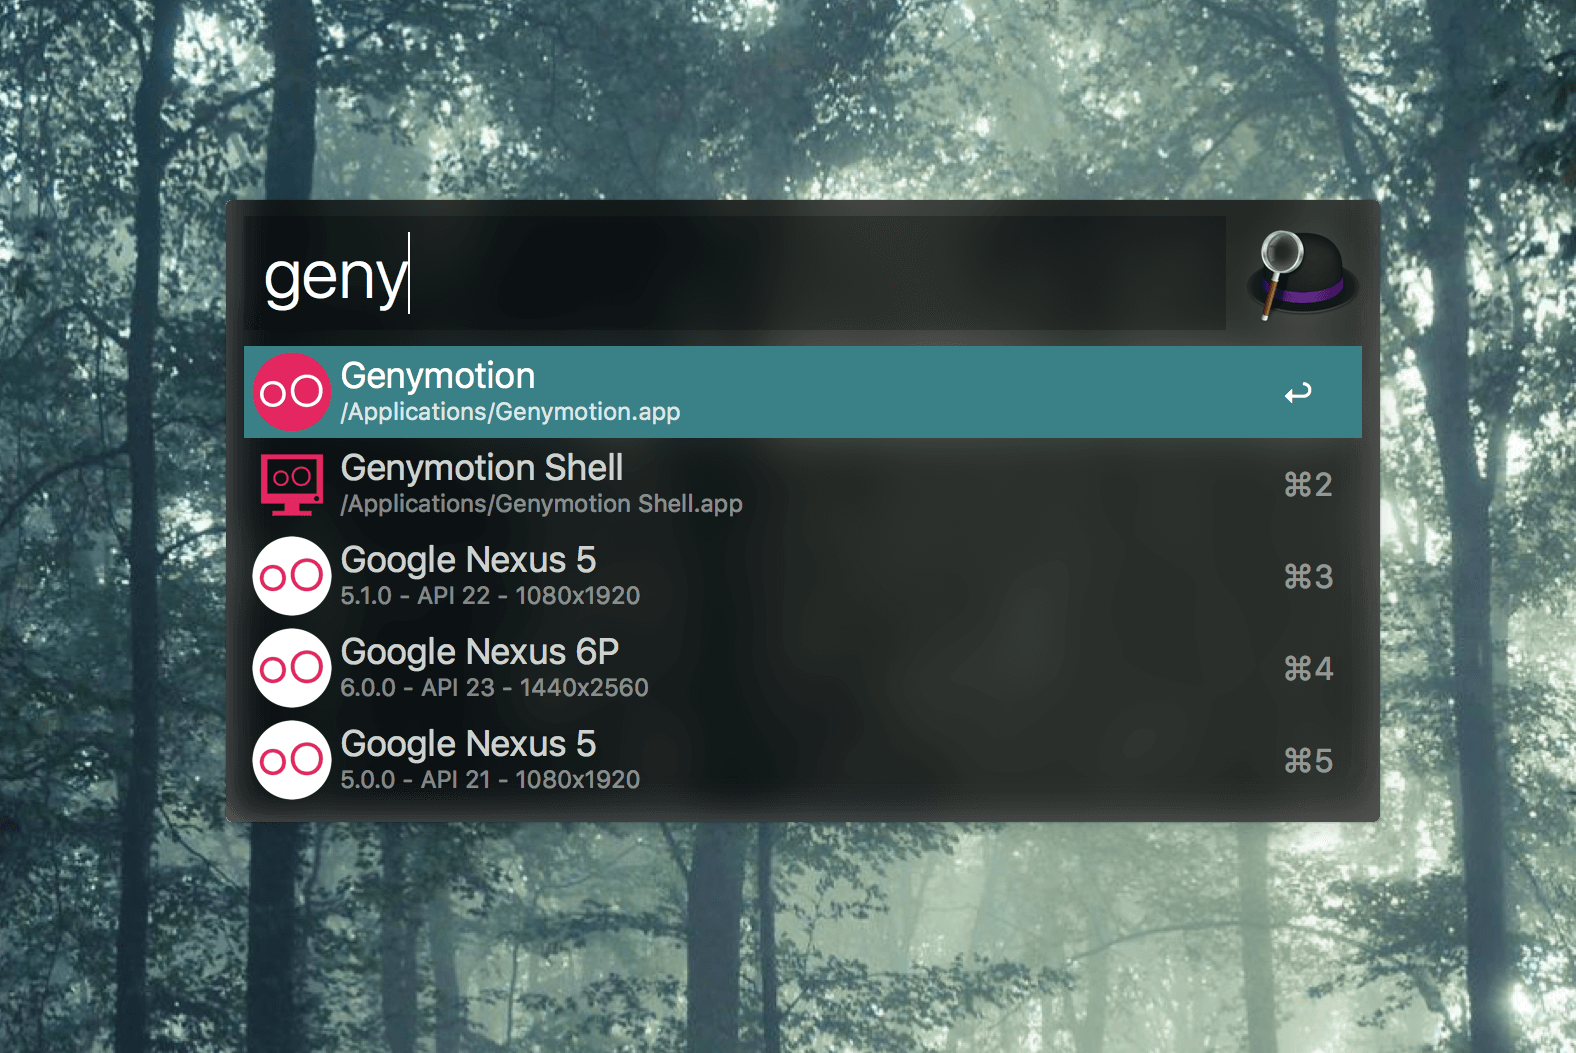 Using Alfred with the Genymotion plugin allows you to launch devices straight from Alfred.
Alfred covers the basics like launching apps (except it learns over time what’s most relevant to you and puts those results on top) and doing calculations (it has a plugin that can harness the power of WolframAlpha). The paid version (£17/$20 or more depending on the license) allows you to have global hotkeys via workflows—a way to extend the functionality of Alfred, which is the feature I use most often. I use the following shortcuts to launch apps on my computer:
- ⌃ + ⌘ + A — Android Studio
- ⌥ + C — Google Chrome
- ⌃ + S — Sublime Text
- ⌃ + T — Terminal
Through the use of workflows, Alfred integrates with other apps as well, allowing you to do things like control Spotify music playback, or tweet directly from Alfred.
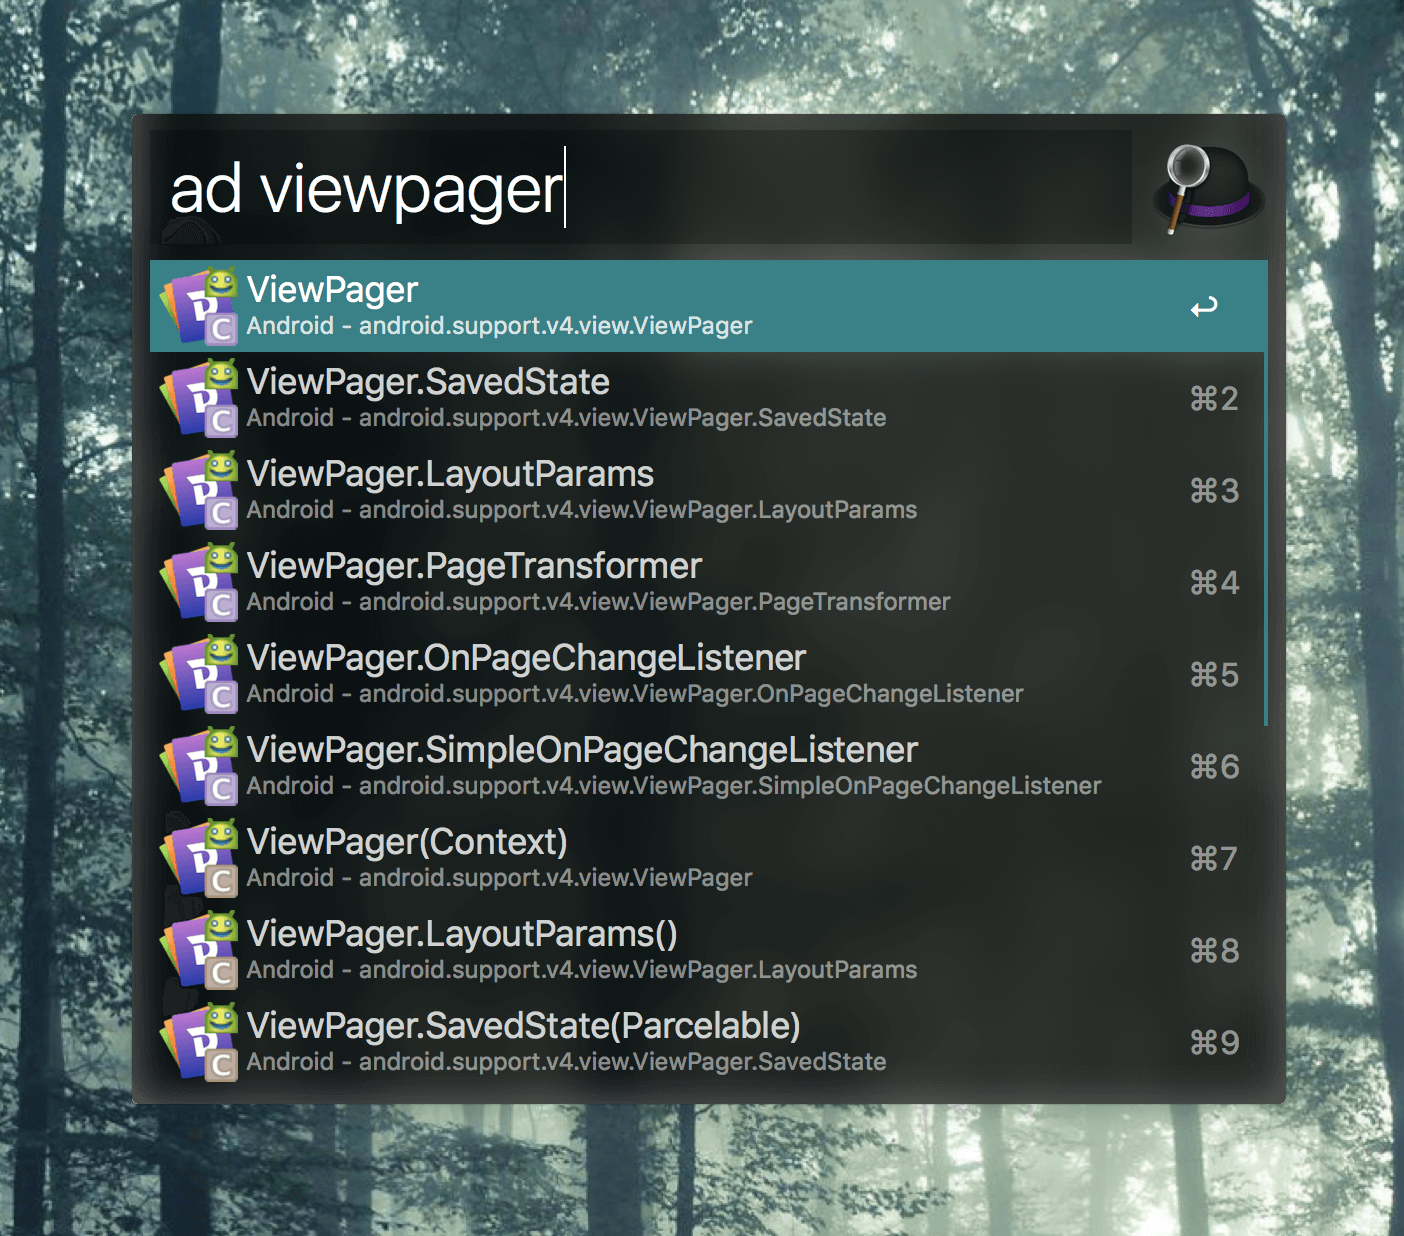 Alfred also has the ability to integrate with Dash, allowing easy search of offline docsets. Here I’m searching an offline version of the Android docs, but I can search the Java documentation just as easily.
My second most used Alfred feature is clipboard management. It allows me to search my clipboard history, even going back months to find a result, so I can paste the old snippet in a document. It’s super useful for when I have multiple things in my clipboard that I’m using repeatedly. (You can try Alfred for free here. )
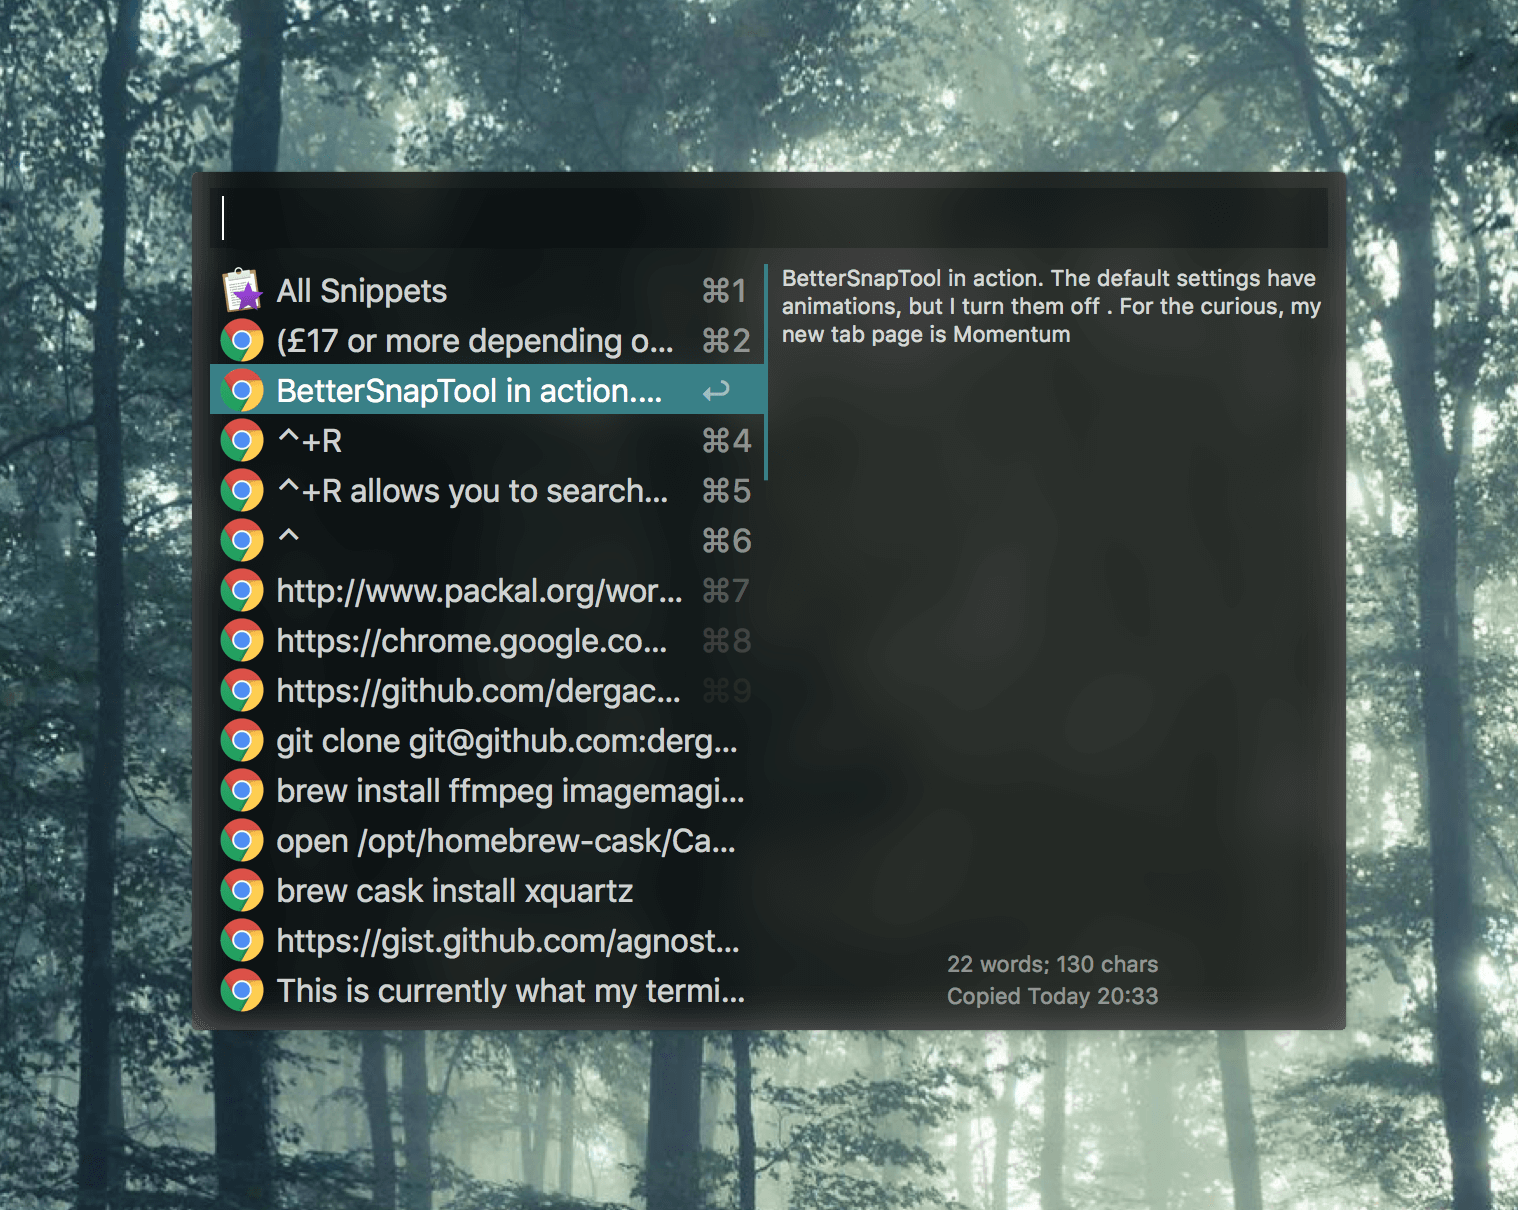 Note the shortcuts appearing at the side of the options. Alfred provides dynamic keyboard shortcuts to select results.
Android Studio
Enough about external software, let’s talk about Android Studio. As an Android developer, this is the tool you’ll be using to actually develop apps, so it’s a given that you’ll be spending a good chunk of your day using it. With Android Studio on the hot path, you gain a lot more time out of your day if you can optimize your usage. Keyboard shortcuts will always be faster than using a mouse, so I suggest moving towards using keyboard shortcuts.
Android Studio has a ton of shortcuts and it would be impractical to list all of them. Over time, as you use Android Studio, you’ll find yourself memorizing shortcuts through repeated usage, but if I had to recommend one shortcut to memorize immediately it would be ⌘+⇧+A. This brings up a prompt allowing you to search for actions or options. It is a shortcut to all the other shortcuts.

Other great shortcuts include ⌘+O, which allows you to open classes, and ⌘+⇧+O, which allows you to open files (including classes). Both of these searches allow for fuzzy search, which means that if your classes are CamelCasedLikeSo, you don’t have to type out an entire word before typing the next word. This allows you to find things much faster than typing out each word at a time. For example, if I was searching for the class CoffeeGrinderImpl, I could search for “CoGrIm” and find exactly what I was looking for.
When searching for classes, you can also append your search with “:line number” to go to a specific line number of that class. Searching for “CoGrIm:42” would take me to the 42nd line of the class CoffeeGrinderImpl. For more on Android Studio shortcuts, tips, and tricks, check out Phillipe Breault’s guest appearance on the Fragmented Podcast.
Another place in Android Studio that gets a lot of usage is the logcat viewer. By default, logging levels (Verbose, Info, Debug, Warn, Error) are all displayed in white or red, and at a glance, it can be difficult to discern what’s what. This is why I’ve colored my logcat output according to this StackOverflow post. This can be done by going to Preferences > Editor > Colors & Fonts > Android Logcat. The colors I’ve set are as follows:
- Debug : 6897BB
- Info : 6A8759
- Warn : BBB529
- Error : FF6B68
- Assert : 9876AA
Here’s a before-and-after shot:
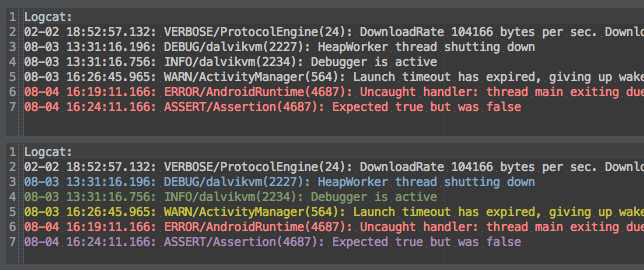 See the rainbow. Taste the rainbow.
Plugins
Android Studio (through IntelliJ) also has many plugins to extend its functionality. One plugin specifically for Android that is useful for beginners and pros alike is Exynap. Invoking Exynap brings up a prompt to enter a command. It accepts prompts such as “Create AlertDialog” or “Hide soft keyboard” and it will drop the code to do the task right into Android Studio. It’s even context aware, so you can put your cursor at a TextView and enter “Fade Out View”, and Exynap will call the correct methods to animate the opacity over a timeframe that you specify.

Another plugin I’d recommend for all Android developers is the ADB plugin, which is able to start, kill, uninstall and clear data from your app. It does have a location in the toolbar when installed, but I’ve never used it because of the amazing ⌘+⇧+A shortcut.
If you’re using Jira to track issues, the Atlassian Connector plugin allows you to manage Jira tasks and even makes comments containing ticket numbers clickable, taking you to the page for that ticket. However, you should be warned: this software is no longer maintained by Atlassian, and as such, any newly discovered issues will go unfixed (For the most part. It’s still open source so if you’re feeling like a good citizen, create a pull request).
Finally, there’s the Dagger plugin which allows you to see where injected dependencies are coming from.

Clicking on a dagger takes you to where the dependencies are coming from.
For the uninitiated: Dagger is a dependency injection framework which allows you to increase your code’s modularity, extendability, and testability. You can read more about dependency injection here. Dagger is one of the most popular dependency injection libraries due to its speed and optimizations for mobile development. Read more about it here.
Android libraries
Speaking of popular libraries, a great Android developer knows when to avoid re-inventing the wheel, especially with common non-trivial problems. One such problem is image loading. There are many complexities to downloading an image, caching it, and displaying it in an ImageView, and even more complexities are introduced when this ImageView is in a ListView or a RecyclerView due to view recycling.
Images
Two of the most popular open source solutions for image loading are Picasso and Glide. These libraries handle all the aforementioned complexities and are incredibly simple to start using. To load an image with Picasso or Glide, you execute the following lines of code:
Picasso.with(context).load("http://i.imgur.com/W3C6LA1.png").into(imageView);
Glide.with(context).load("http://i.imgur.com/W3C6LA1.png").into(imageView);
Long running tasks
Some libraries even have advantages over using the Android SDK’s solution, for example, Android’s AsyncTask vs RxJava. An AsyncTask is used to perform long running operations (such as network calls or reading/writing to a disk) on a thread different from the main thread. (Aside: Why should you keep long-running tasks off the main thread?)
The main thread a.k.a. the UI thread, as you might’ve guessed, is used to process the UI. Any time a user clicks a button or scrolls on their screen, the main thread processes that event and renders a new frame for the app at 60 frames per second (fps). 60 fps equates to a deadline of 16ms per frame.
You can think of the way Android draws frames as a train that arrives every 16ms. Every time that train comes, you have to finish updating the UI so a new frame can be rendered, otherwise you miss the train that will draw that particular frame to the screen. The longer you take to finish updating the UI, the more trains you miss. More trains missed means more frames not drawn to the screen.
Another way of putting it is that the frame rate drops. A drop in frame rate is perceived by the user as the app being frozen, lagging, or janky. You don’t want a janky app. Now, back to AsyncTask.
There are several shortcomings of AsyncTask that RxJava handles more eloquently. For example, AsyncTasks run in serial (one after the other) by default. If you wanted to perform several background actions using AsyncTasks simultaneously, you’d have to implement a custom executor and coordinate the threads using complex synchronization patterns. RxJava handles threading and synchronization for you, and it does so in a simple way. It can chain web service calls, run a batch of them in parallel, merge, filter, and then sort the results before returning them to the main thread in only five lines of code.
Activity and Fragment views
No one, especially not developers, likes repetitive tasks. One of the most repetitive tasks for Android developers can be when setting up Activity and Fragment views for the first time. For each view, you have to not only call findViewById(…), but also cast it to the right view type. This can end up creating a lot of clutter, a.k.a boiler-plate code in your app. With ButterKnife the process becomes a lot easier, and your code a lot cleaner. Simply annotate your view with @Bind(R.id.your_view_id), then call ButterKnife.bind() in onCreate() for Activities and onCreateView() for fragments, and ButterKnife will execute those pesky findViewById() calls and cast your views to the right type so you don’t have to.
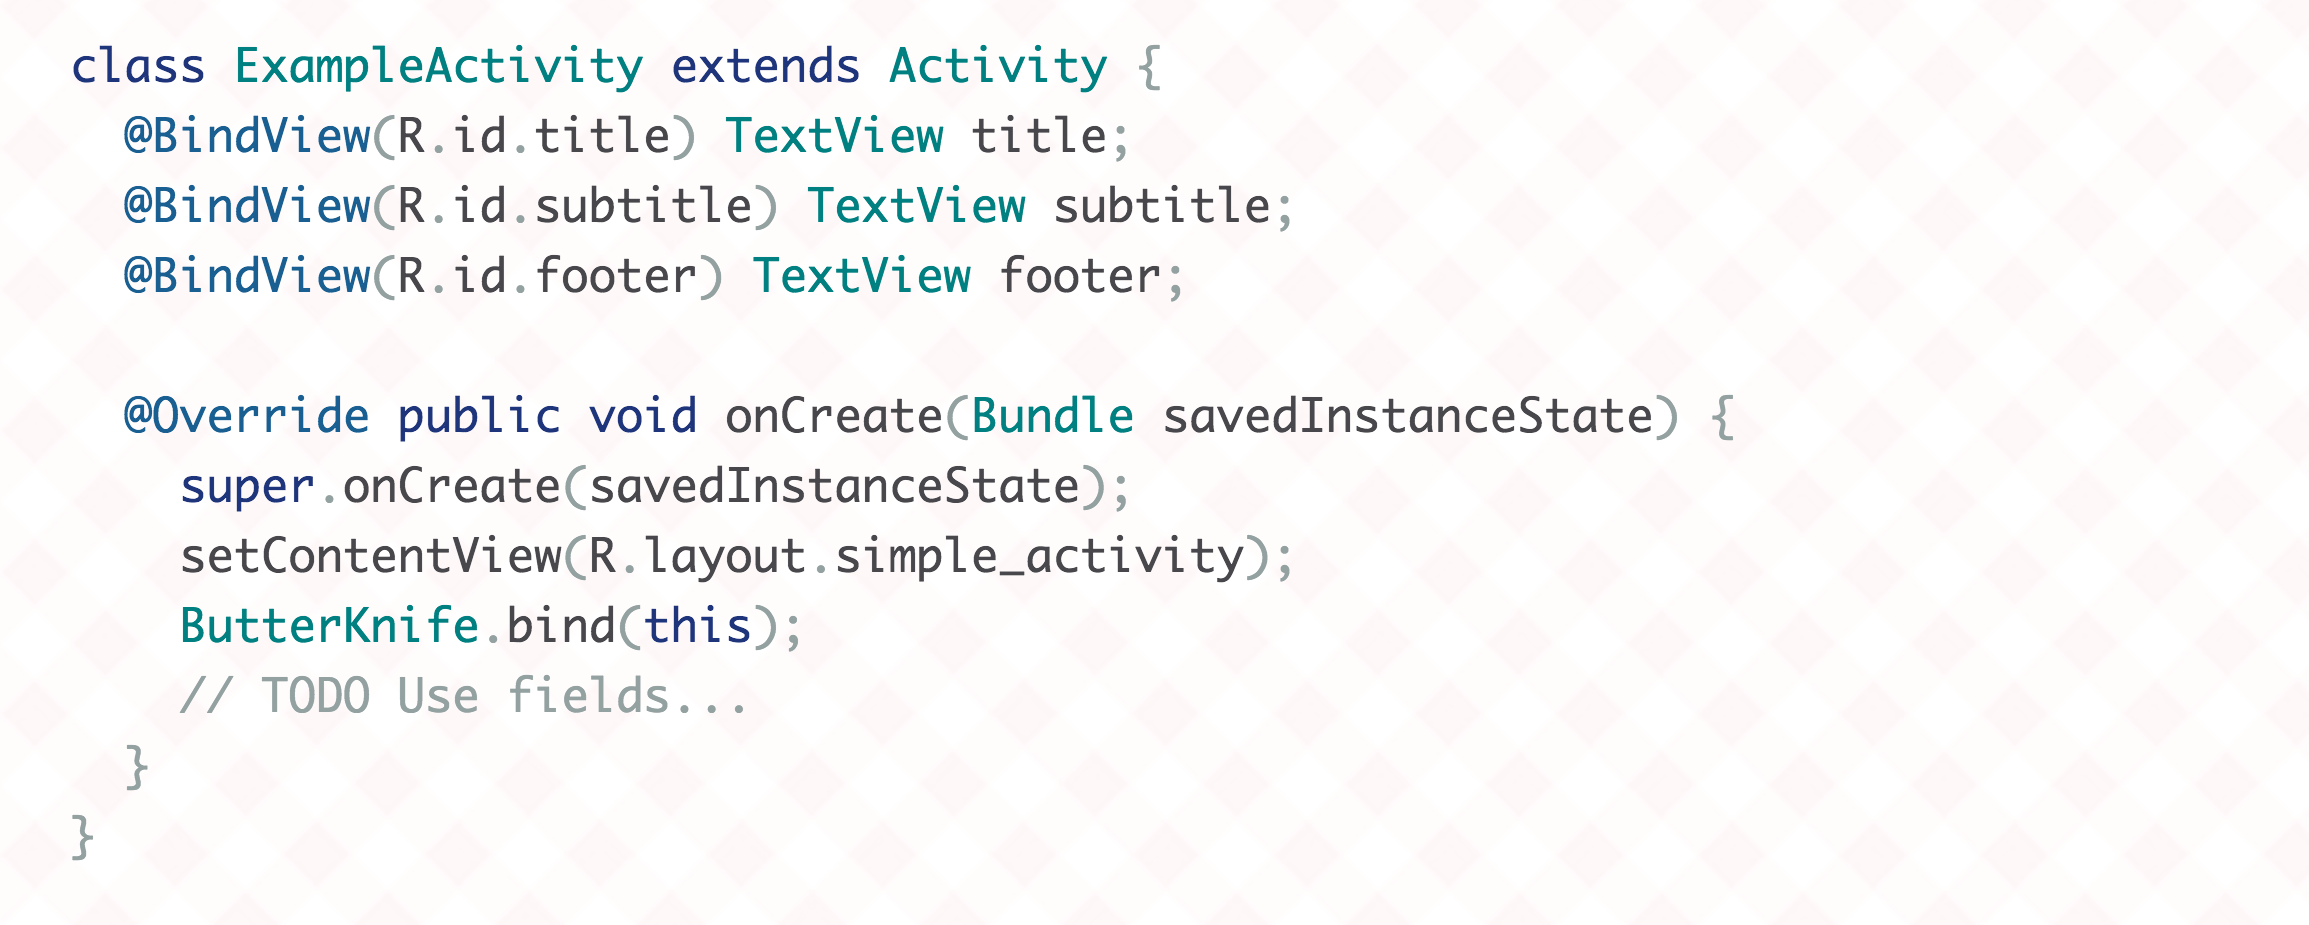 Using Butterknife
In addition to binding views, ButterKnife can also bind resources, as well as onClickListeners so that annotating a method with @OnClick(R.id.your_view_id) ensures that this method gets called whenever that view is clicked.
Database managment
The default way to store information in a database with Android is to use SQLite to query your data and a Cursor object to read retrieved data. Since you’re not dealing with objects, you often have to write a wrapper around a Cursor object to convert a row of primitives into your desired object. This wrapper needs to be updated manually every time your schema changes. Querying a SQLite database is also a long running operation, so it can’t be done on the main thread. This means some sort of threading will have to be introduced.
With Realm, your objects are your data so there’s no need to write converter code, simply store your objects directly in a database. Realm queries are also very fast—fast enough to be on the main thread, so you can save the headache of multi-threading for another day. In addition to being fast, Realm queries can also auto-refresh, so your UI will always be up to date.
Share your toolchain
Of course, this isn't an exhaustive list for Android tools and libraries, but it should be more than enough to get you on your way to becoming a more productive Android developer. If you have any additional tools or better alternatives that you would suggest to Android developers, share them in the comments.
For more Android advice, follow TechBeacon's 40 leading Android experts on Twitter.
Image credit: Flickr
Keep learning
Take a deep dive into the state of quality with TechBeacon's Guide. Plus: Download the free World Quality Report 2022-23.
Put performance engineering into practice with these top 10 performance engineering techniques that work.
Find to tools you need with TechBeacon's Buyer's Guide for Selecting Software Test Automation Tools.
Discover best practices for reducing software defects with TechBeacon's Guide.
- Take your testing career to the next level. TechBeacon's Careers Topic Center provides expert advice to prepare you for your next move.
