
RxJava 2, which was released some time back, featured a major rewrite of the entire library. But without an in-depth and proper understanding of the fundamental concepts of reactive programming, you are not going to get far with it.
Here is a deep dive on the core concepts of RxJava, with the help of several real-world examples, and easy-to-understand code samples that will help the fundamentals stick in your memory.
The asynchronous world of Android
Perhaps you haven't thought about it, but the world of Android is asynchronous in many ways. If you need to read/write data to the disk, you must wait for some time before the operation is complete. It can’t happen instantly, right?
The situation is similar when you are making a network call to retrieve data from a remote server. The network call is not synchronous. It will take some time, from a few milliseconds to a few seconds, depending on your network quality, server load, etc.
If you give it some more thought, you will realize that the whole user input mechanism is asynchronous in nature. The device is continuously waiting for user inputs such as touch, drag, swipe, pinch, etc., and it reacts to those inputs accordingly.
Let’s start thinking reactive
In fact, almost everything in the Android world is asynchronous, from database transactions, file operations, and network calls to heavy computation, user inputs, and push notifications.
So why are we working so hard in modeling our apps in a synchronous fashion when the world in which they will run is heavily asynchronous in nature?
Isn’t that a question you should ask yourself before diving into writing apps? Shouldn't you think of using a better approach that can make your life slightly easier?
Start thinking in a reactive way. I know it might be difficult after a lifetime of thinking and writing code in an imperative way. But we all need to make a start somewhere, right?
Reactive programming is not difficult; it is just different.
Reactive programming is immensely powerful, but also easier if you know how to make proper use of it. If it seems difficult to you, that simply means that you have not got the concepts right yet.
It can take time—maybe a lot of time—but once you get it, you will surely fall in love with its beauty and power.
Focus on understanding the core concepts and fundamentals first. Try to think of scenarios where you can make the best use of them, and whenever you are stuck, remind yourself that you might need to change the way you are thinking or approaching the problem.
The benefits of taking the reactive road
If you are beginning to see the power that reactive programming can put into your hands, consider the immediate benefits you will enjoy by introducing RxJava in your Android development.
Multi-threading like a boss
Multi-threading can be difficult in Java. Reactive programming can make it insanely easy and convenient to perform complex threading operations, maintain synchronization, and get the results delivered back to your friendly UI thread.
Eliminating the dreaded “callback hell”
When you need to perform multiple asynchronous operations, and each of them depends on the result of the previous operation, you unknowingly start creating callback hell in your code.
It becomes extremely difficult to understand and maintain codebases like that. With reactive programming, you can completely eliminate this scenario and write clean, concise, and maintainable code.
Error handling becomes a breeze
It’s not always sunshine and rainbows when you are interacting with real-world asynchronous sources of data, such as the network, databases, files, etc.
They might sometimes fail, and when they do, you need to have a robust error-handling mechanism in place to tackle various critical scenarios with ease.
An arsenal of operators
The real power of reactive programming comes from the huge arsenal of well-tested and powerful operators that can help you perform several common (and not-so-common) tasks with ease. There are lots of operators available in the inventory, and this is exactly where most developers get overwhelmed.
You need to start by understanding some of the basic operators and then slowly learn more as you need them. You don’t need to learn everything on day one.
Less code, fewer mistakes, fewer bugs
When you write code in a reactive way, the code is more readable, understandable, and maintainable. You will write significantly less code, be less frustrated, make fewer mistakes, and write more robust and stable code.
Enjoy cross-platform support
Reactive programming is a programming paradigm that is available across several languages, including as Java, JavaScript, Python, Swift, Kotlin, C++, and more.
It doesn’t matter if you are working on a mobile platform, the web, or back end. The knowledge you gain once can help you write better code everywhere.
These are just some of the benefits of taking the reactive approach to writing code. You'll discover even more as you start your journey to reactive programming.
Let’s talk about RxJava
To put it in the simplest words possible, reactive programming is a paradigm where the consumer reacts to data as it comes. It is a concept, and ReactiveX is the project that aims to provide implementations of this concept across multiple programming languages.
As the ReactiveX web page headlines the matter:
The observer pattern done right.
ReactiveX is a combination of the best ideas from the observer pattern, the iterator pattern, and functional programming.
RxJava is just the implementation of this concept for the Java programming language. Recently, a major update was released that rewrites the entire library from scratch on top of the Reactive Streams specification.
I focus on RxJava 2 in this article.
The 3 O's of RxJava
The core concepts of RxJava are observables, observers, and operators.
In the reactive world, consider everything as a stream. Something would produce/emit a stream of data for something else to modify or consume. But this is actually not a new concept by any means. This is just the observer design pattern in action, but it is infinitely more powerful.
Examples of streams of data include sensor data changes, location updates, touch events in the UI, and push notifications.
Observables
Something that can be observed is an observable. It represents the source of data that you are interested in and want to observe.
Here's a real-world example. Suppose you attend a conference where the speaker is someone you are interested in hearing. This speaker is an observable who produces streams of information for you to consume.
Hot versus cold observables
Observables can emit items only when someone subscribes to them. For example, the conference speaker is not likely to talk until there is someone in the room to listen. These are called cold observables.
Similarly, we some observables emit items even if no one has subscribed to them. This is like a speaker who starts giving a presentation to an empty room. Attendees can arrive later and start listening. These are called hot observables.
In the Android world, a cold observable can be a network call that doesn’t fetch (or emit) data if no one is subscribed to it. The observable makes the network call, fetches the data, and emits it only if someone is interested in this event and subscribes to it. These emissions are not shared across multiple subscribers.
A hot observable, on the other hand, can be the location update event stream. Location updates will still continue to happen even if no one is interested in them. If a subscriber eventually shows interest in these updates and considers subscribing, then it will start getting the updates that are emitted from the point of its subscription, but it will not affect the stream.
Get, set, code
An example of an observable you would typically use will be something such as this:
Observable<Movie> movieObservable = remoteService.getMovies();
Here, the observable can emit Movie objects retrieved from some remote data source. There can be a single item, multiple items, or no items emitted by this observable. If the observable is unable to fetch data, it will signal an error.
If you need to create an observable, here is how you can do it:
Observable<Movie> movieObservable = Observable.create(emitter -> {
    try {
        // Fetches Movie objects from the network, database, etc.
        List<Movie> movies = getMovies();
        for (Movie movie : movies) {
            emitter.onNext(movie);
        }
        emitter.onComplete();
    } catch (Exception e) {
        emitter.onError(e);
    }
});
We will talk about the onNext(), onComplete(), and onError() methods later in detail. Here are some convenience methods for you to create observables quickly:
- Observable.just()—Creates an observable around any data type and emits the given item.
- Observable.fromArray()—Creates an observable that emits all the items of the given array one by one.
- Observable.interval()—Creates an observable that emits a sequence of integers in a given interval of time.
- Observable.empty()—Creates an observable that emits nothing and completes successfully.
- Observable.error()—Creates an observable that emits nothing and throws an error.
Check out this page for a complete list of all the ways in which you can create an observable.
Observers
Anything that is interested in an observable and subscribes to it can be called an observer. Whenever the source observable emits some item, all the subscribed observers are notified about it.
In our contrived conference example, all the attendees who were listening to the speaker are nothing but observers. Whenever the speaker says something from the stage, all the attendees can listen and react to it.
There can be a single observer or multiple observers subscribed to the source observable, and all of them will get notified whenever the source observable emits something.
There are primarily three types of events that your observer can receive:
- onNext(T) will be invoked when the source observable emits a particular item (of type T). It will get called multiple times if the source observable has got multiple items to emit.
- onCompleted() will be invoked when the source observable completes emitting all of its items. This is a terminal event, and there can be no more items emitted after this point. This simply indicates that the observable has completed successfully.
- onError(Throwable) will be invoked when the source observable encounters an error while emitting items. This is also a terminal event, and there can be no more emissions after this point as well. It indicates that the observable has failed. It provides a throwable, which contains details of the error.
Get, set, code
Now let’s have a look at some real code:
DisposableObserver<Movie> disposable = movieObservable
        .subscribeWith(new DisposableObserver<Movie>() {

            @Override
            public void onNext(Movie movie) {
                // Access your Movie object here
            }

            @Override
            public void onError(Throwable e) {
                // Show the user that an error has occurred
            }

            @Override
            public void onComplete() {
                // Show the user that the operation is complete
            }
        });
This might seem like a lot at once, but it’s actually pretty simple.
All we do here is use the subscribeWith() method to subscribe to the movie observable. We are using a DisposableObserver, which has three methods for the three different event types discussed earlier. The onNext(Movie) method will be called every time a Movie object is fetched by the observable. It can be fetched from the network, database, files, or any other source. All that matters is that the observer(s) subscribed to it will always be notified of the events happening in the stream.
So, if you have 10 movies in your data store, the onNext() method will be called 10 times with 10 Movie objects. After the operation succeeds, the onComplete() method will be called, but if the operation fails, the onError() method will be called with the appropriate error object.
Dispose, but what?
DisposableObserver is nothing but an observer that can be disposed of as it implements the Disposable interface. Whenever an observer subscribes to an observable, a connection is formed between them that effectively needs to be cleared (or terminated) when not needed. Otherwise it can lead to resource leaks.
A listener should not be listening to events eternally; it needs to stop sometime. This is similar to scenarios where you need to close a database cursor or a file input/output stream when you are done using them, because otherwise those unreleased resources can increase the memory footprint or cause leaks.
Your observers are nothing more than garbage after they have done their job. So this is something you can do to dispose of your observables when you don’t need them anymore:
@Override
public void onDestroy() {
    if (disposable != null && !disposable.isDisposed()) {
        disposable.dispose();
    }
    super.onDestroy();
}
You can also use a CompositeDisposable to add up all your disposables and get rid of all of them at once just like this.
Operator
The real power of RxJava comes with the huge arsenal of operators it brings to the table. The operators are pure functions that transform or modify observable streams.
Going back to our conference example, suppose a new speaker comes up and starts speaking in German, but the attendees understand only English.
This is where a translator can come into play who can translate every sentence of the speaker into something meaningful that all the attendees can understand.
Let’s talk about some RxJava operators:
- filter()—We can use this operator to refine the items emitted by the source observable and create a new observable containing only those items that match the required condition.
Suppose our movie observable emits lots of movies having different ratings (from 1 to 5 stars), but we want to show only those movies that have a 5-star rating,
movieObservable.filter(new Predicate<Movie>() {
    @Override
    public boolean test(@NonNull Movie movie) throws Exception {
        return movie.getRating() == 5;
    }
});
And the mighty lambdas can turn it into something such as this:
movieObservable.filter(movie -> movie.getRating() == 5);
- map()—We can use this operator to transform items emitted by the source observable into something completely different and create a new observable containing those modified items.
Suppose we have a requirement that the synopsis of the movies to be shown cannot be more than 500 characters.
Observable<Movie> movieObservable = getMoviesFromDatabase();
movieObservable.map(new Function<Movie, Movie>() {
    @Override
    public Movie apply(@NonNull Movie movie) throws Exception {
        return StringUtils.truncate(movie.getSynopsis(), 500);
    }
});
After using lambdas and static imports, we have something such as this:
movieObservable.map(movie -> truncate(movie.getSynopsis(), 500));
Now we have created a completely new stream of movies where each contains a synopsis not greater than 500 characters.
- skip()—We can use this operator to skip some items from the beginning source observable and create a new observable that doesn’t have these items.
Suppose we know that our movie observable always emits a dummy Movie object (containing some metadata) in the beginning of the stream that should not be shown to the user.
movieObservable.skip(1);
- concat()—We can use this operator to concatenate items from multiple observables one after the other without interleaving them.
Suppose we have two data sources to fetch movies from—database and network—and we want to show the movies fetched from the database first followed by the ones fetched from the network.
Observable<Movie> database = getMoviesFromDatabase();
Observable<Movie> network = getMoviesFromNetwork();

Observable<Movie> resultObservable = Observable.concat(database, network);
We can now subscribe to this resultObservable having movies from the database being emitted before the movies from the network.
We have already observed that the return type of these operator methods is also an observable, which enables us to chain multiple operators one after the other and perform crazy things.
movieObservable
        .skip(1)
        .filter(movie -> movie.getRating() == 5)
        .map(movie -> truncate(movie.getSynopsis(), 500));
In this example, we are skipping the first item emitted in the stream, then filtering only those movies with a rating of 5, and then truncating the synopsis of each movie item to 500 characters. All of this happens in just four lines of code.
There are hundreds of operators available in RxJava, and explaining each of them would take over 10,000 words. Reading an article that long would be a pain for you, so here is a link to a complete list of all the operators available to you.
Bonus concepts
This article would be incomplete if I didn’t touch upon two important concepts: observeOn/subscribeOn and schedulers.
observeOn/subscribeOn
These are just like the other operators discussed, but these can be used to easily control multi-threading in RxJava.
subscribeOn()
Use this operator to specify on which thread the source observable will emit its data. This operator works only on the source observable.
Suppose your source observable is supposed to fetch data from the network. Obviously, this operation must be performed in the background thread because Android doesn’t allow network operations on the main thread.
This is where the subscribeOn operator comes into play. You can use this operator only once. If you do use it multiple times, only the one defined closest to the source will take effect.
movieObservable
        .subscribeOn(Schedulers.io())
        .subscribe(movie -> {
            // Use your movie item here
        }, throwable -> {
            // Handle the error here
        });
This will make the movie observable operate on the I/O thread. Now see an another variant:
movieObservable
        .subscribeOn(Schedulers.computation())
        .subscribeOn(Schedulers.io())
        .subscribe(movie -> {
            // Use your movie item here
        }, throwable -> {
            // Handle error here
        });
You might be thinking that the second subscribeOn() (with Schedulers.io()) will take its effect. But only the subscribeOn() defined closest to the source will play its magic and nothing else.
observeOn()
You can use this operator to specify on which thread the observer will observe the emissions.
Suppose your source observable emits items on the I/O thread. In Android, in order to show something in the UI you must consume data on Android’s main thread only. So this is where observeOn() comes into play.
movieObservable
        .subscribeOn(Schedulers.io())
        .observeOn(AndroidSchedulers.mainThread())
        .subscribe(movie -> {
            // Use your movie item here
        }, throwable -> {
            // Handle error here
        });
Now you will be able to access and show your movie items in the UI as they are all observed in the UI thread. But in the previous example, because observeOn() was not used, all the items were both emitted and observed in the I/O thread.
Unlike with subscribeOn(), we can use observeOn() multiple times for seamless thread switching.
movieObservable
        .subscribeOn(Schedulers.io())
        .observeOn(Schedulers.computation())
        .flatMap(movie -> truncate(movie.getSynopsis(), 500))
        .observeOn(Schedulers.io())
        .filter(movie -> isInDatabase(movie))
        .observeOn(AndroidSchedulers.mainThread())
        .subscribe(movie -> {
            // Use your movie item here
        }, throwable -> {
            // Handle error here
        });
This is a contrived example to make you understand how you might use it in real scenarios. I have used observeOn() three times. The source observable emits items on the I/O thread, then I switch to the computation thread to perform the truncate operation (let’s assume it demands complicated computation) specified just after that.
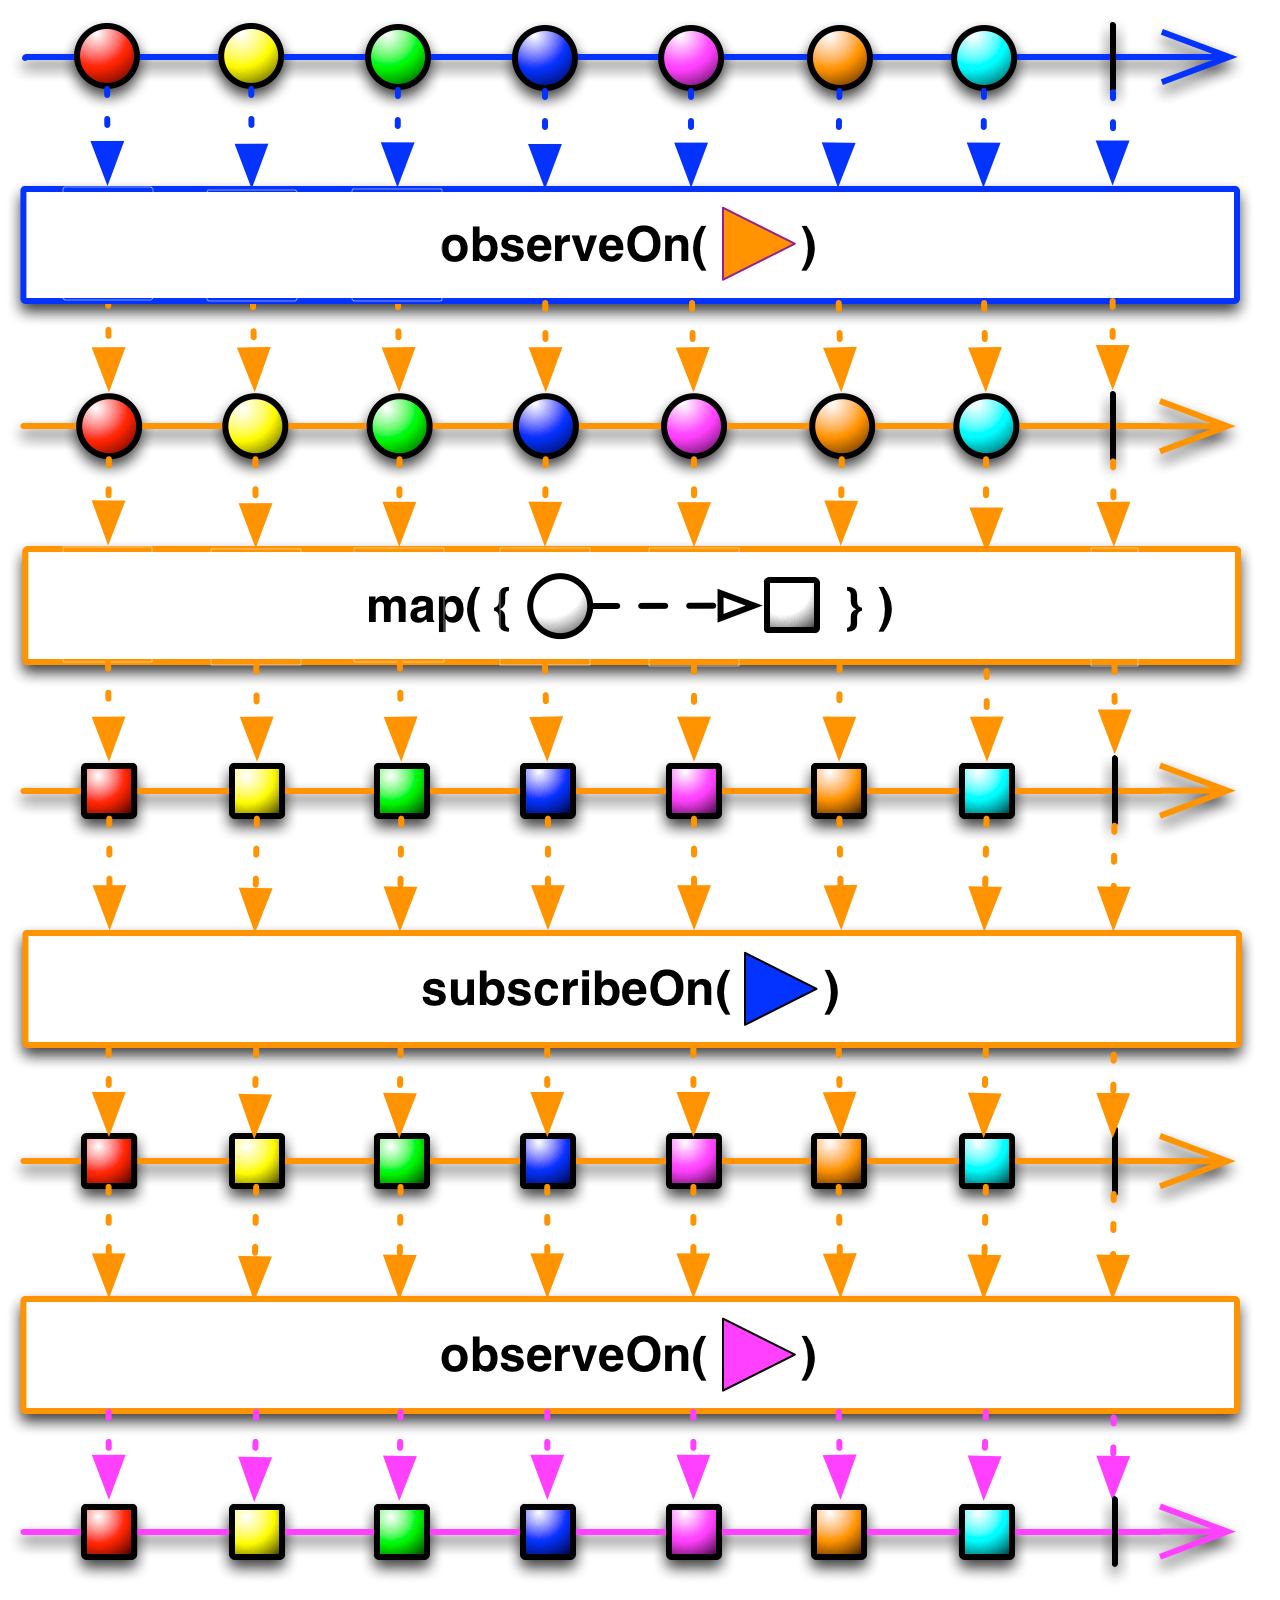 Marble diagrams in RxJava
After that, I again switch to the I/O thread to perform the filtering operation where I only take those items that are already present in the database. Now I switch threads for the last time to the main thread so that the observer specified just after that is able to observe and consume items on Android’s main thread.
So, in just seven lines of code, I have done a lot of multi-threading, which would have taken a lot of time and effort if we had to do it in the traditional way.
Schedulers
Because you have already seen some schedulers used in some of the previous examples and might have been wondering what these things are.
Schedulers represent a particular thread for operations to be performed.
There are several schedulers available in RxJava, including:
- Scheduler.io()—for operations to be performed on the I/O thread, such as network call, database transactions, file access, etc.
- Scheduler.computation()—for operations that are computationally heavy and need to be performed on a thread that is optimized for this purpose, such as parsing a huge dataset of a few million phone numbers.
- Scheduler.newThread()—for operations to be performed on a completely new thread. You should probably restrict yourself from creating new threads all the time and use the other schedulers available so that the framework can work on improving the threading performance using techniques such as thread pooling.
- Scheduler.immediate()—for testing and debugging purposes where you can perform the operation on the current thread itself and not on a separate thread.
- AndroidSchedulers.mainThread()—for operations to be performed on Android’s main thread, such as showing data on the UI. You need to use the RxAndroid library for it, though.
Now go try it yourself
By now you should have a pretty good grasp of the concepts behind reactive programming and how you can start using RxJava 2 to supercharge your Android development.
If there is something that is still unclear in your mind, consider giving this article another read. The fundamental concepts revolving around observable, observer, operator, and schedulers should be crystal clear in your mind to make proper use of RxJava in your app.
Also, try firing up your IDE, and start playing around with the APIs. Only then can you have a solid grasp of this immensely powerful tool. Once you fall in love with it, there will be no looking back.
Keep learning
Take a deep dive into the state of quality with TechBeacon's Guide. Plus: Download the free World Quality Report 2022-23.
Put performance engineering into practice with these top 10 performance engineering techniques that work.
Find to tools you need with TechBeacon's Buyer's Guide for Selecting Software Test Automation Tools.
Discover best practices for reducing software defects with TechBeacon's Guide.
- Take your testing career to the next level. TechBeacon's Careers Topic Center provides expert advice to prepare you for your next move.
